Configuring Reports
Configuration > Reports > Reports
This page is used to manage, modify, and create Reports.
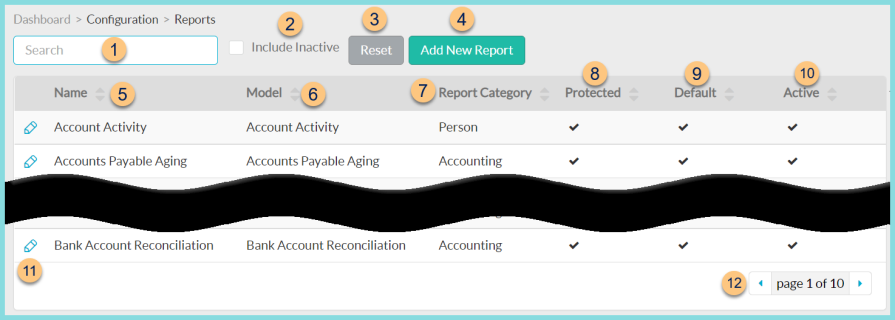
Reports Screen
-
Search - search by name
-
Include Inactive - check to include inactivated reports
-
Reset - click to reset search parameters
-
Add New Report - click to add a new report
-
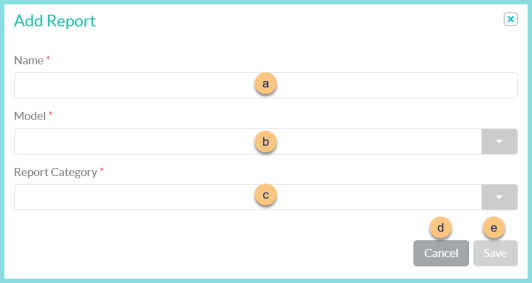
Name - enter report name
-
Model - select report model
-
Report Category - select report category. This is where the report will appear in the Reports menu.
-
Cancel - click to return to the previous screen without saving changes
-
Save - click to create the report and be redirected to the individual report screenName - click to sort by name
-
-
Model - click to sort by model
-
Report Category - click to sort by report category
-
Protected - click to sort by protected status
-
Default - click to sort by default status
-
Active - click to sort by active status
-
Pencil - click to be redirected to the individual report screen
-
< > - click to scroll through pages
Individual Report Screen
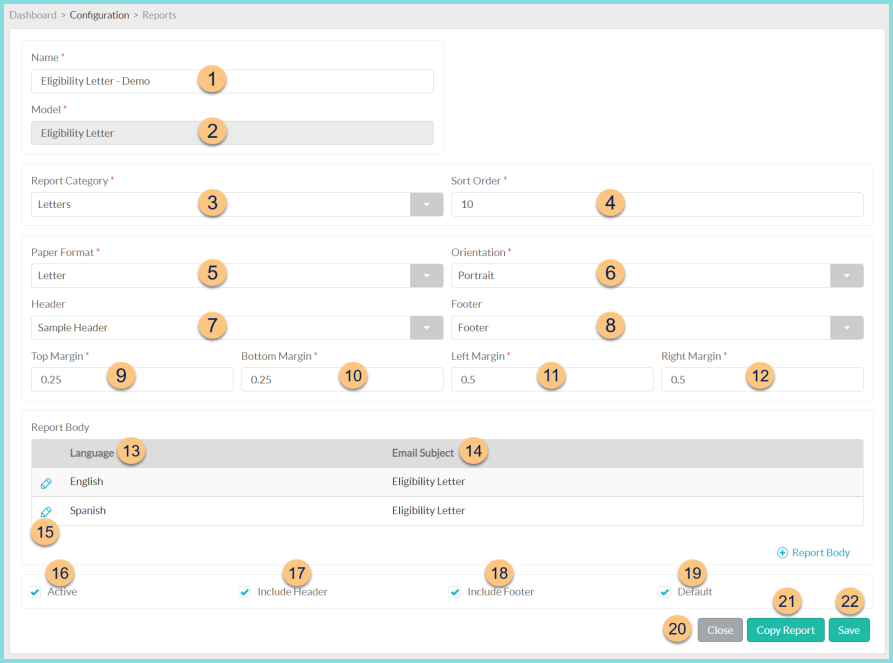
Note: Some reports are protected an not editable. Create a copy to edit fields, and then make the copy the default to replace the protected version of the report.
-
Name - change name if needed
-
Model - notice the report model (not editable)
Output (not pictured, non-letters only)
-
Report Category - select report category where the report will appear in the reports menu
-
Sort Order - change sort order if needed
-
Paper Format - change paper format if needed (Legal, Letter, CR80)
-
Orientation - change orientation if needed (Portrait, Landscape)
-
Header - select Header
-
Footer - select Footer
-
Top Margin - enter top margin in inches. Report body will begin at Top Margin + Header Height
-
Bottom Margin - enter bottom margin in inches. Report body will end at Bottom Margin + Footer Height
-
Left Margin - enter left margin in inches
-
Right Margin - enter right margin in inches
-
Language - notice report body language
-
Email Subject - notice email subject
-
Pencil - click to edit report body. See Step 16 for details.
-
(+) Report Body - click to add a new report body
-
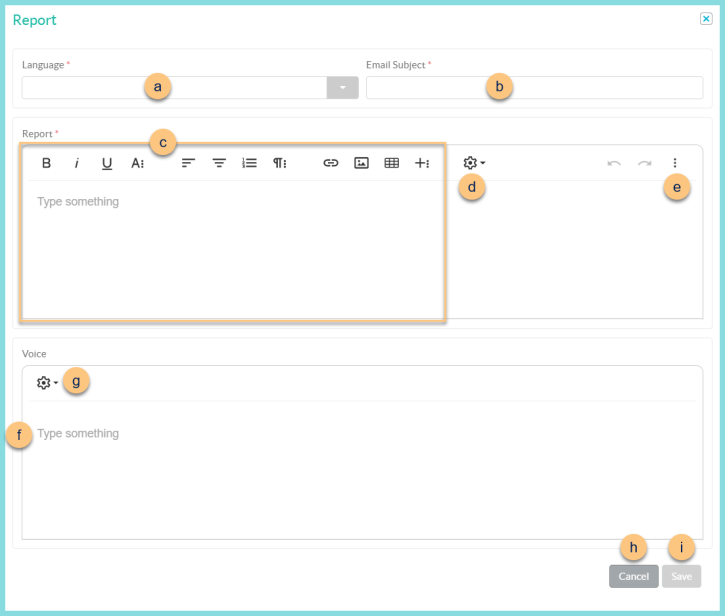
Language - select language
-
Email Subject - enter email subject line for emailed letters
-
Report Type Something - enter report body text and use the WYSIWYG editor for formatting
-
Gear Icon - click to insert dynamic fields as needed
-
Kabob - click to enter Code View (< >) to edit HTML
-
Voice Type Something - enter text for voice and SMS messages. Note: This field is only visible for districts with voice and/or SMS licenses.
-
Gear Icon - click to insert dynamic fields as needed
-
Cancel - click to return to the previous screen without saving changes
-
Save - click to save changes
-
-
Active - toggle active status
-
Include Header - check to include report header
-
Include Footer - check to include footer
-
Default - toggle default status
-
Close - click to return to the previous screen without saving changes
-
Copy Report - click to create a copy of the report and be redirected to that report's screen. Making a copy of a protected report allows editing of a custom report.
-
Save - click to save changes